If you’ve clawed your way to Act 3 in Slay the Spire 2, you already know the game doesn’t play fair. But nothing halts a god-tier run quite like the Doormaker.
Unlike bosses that politely stand in front of you and trade blows, the Doormaker is a coward with an escalating health pool and a serious stalling problem. It hides behind proxy minions—literally floating, magical Doors—and refuses to take damage until you smash its barricade. If you try to play a slow, defensive war of attrition, this boss will permanently scale its Strength stat and crush you. To beat the Doormaker, you need to throw out the slow-play rulebook and focus entirely on aggressive burst damage, exploiting its narrow windows of vulnerability before it scales out of control.
Editor’s Recommendations:
- What are Status Cards in Slay the Spire II? Everything we know
- How to Break Slay the Spire 2 With the ‘Howl From Beyond’ Card
Here is your definitive cheat sheet for surviving the Doormaker’s phase cycle.
| Phase | Enemy | HP Base | The Threat | The Playbook |
| Phase 1 | The Door | 155 (+20 per respawn) | Attacks for 15-30 HP. Casts Empower on Turn 3, permanently buffing the boss’s Strength. | Kill it before Turn 3. If it’s low on HP, wait until the start of your next turn to deal the killing blow so you have full energy for Phase 2. |
| Phase 2 | The Doormaker | 489 | Arrives Stunned on Turn 1. Deals massive burst damage (30-40+ HP) on Turns 2 and 3 before retreating. | Unload your highest-damage combos and potions on Turn 1. Set up persistent debuffs (Vulnerable/Weak) that will carry over to the next cycle. |
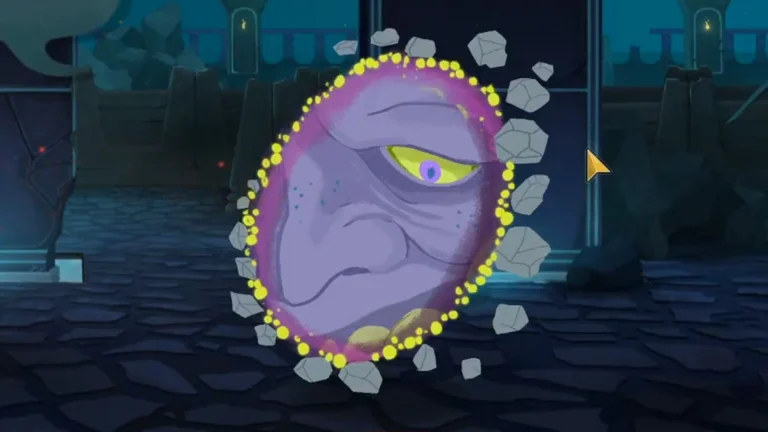
Breaking Down the Door Phase
When the fight starts, the Doormaker is nowhere to be seen. Instead, you are staring down a floating pile of rubble with 155 health. This Door is essentially a DPS check.
For the first two turns, the Door will hit you with either one heavy attack or two lighter ones, totaling around 15 to 30 damage. You need front-loaded block—like the Defect’s Boot Sequence or the Ironclad’s Iron Wave—to mitigate this early chip damage.
However, your primary goal is speed. On Turn 3, the Door will attack and cast Empower, granting permanent Strength to the Doormaker. You must absolutely avoid letting the Door survive to Turn 3. Burst it down fast.
Pro-Gamer Tip: If the Door is at 5 HP at the end of your turn and you only have 1 energy left, do not kill it. End your turn, take the hit (or block it), and kill the Door at the very start of your next turn. The instant the Door dies, the Doormaker spawns. You want a full energy bar and a fresh hand of cards when that happens.
Exploiting the Doormaker Phase
Once the Door crumbles, the Doormaker steps out with a staggering 489 HP. But it has a fatal flaw: Turn 1 is a guaranteed Stun. The Doormaker will do absolutely nothing on its first turn. This is the single most important window in the entire Act 3 map. Forget blocking. Dump your entire hand into your heaviest attacks, scaling powers, and burst combos.
After the stun wears off, the honeymoon is over. On Turn 2, the Doormaker swings for roughly 30 damage. On Turn 3, it hits for 40+ damage, casts Empower to buff its Strength again, and transforms back into a Door (which now has 20 more HP than the last one). You effectively have three to five cycles to chew through its 489 HP before the escalating Strength buffs make the incoming damage mathematically unblockable.
Build Matchups: Who Wins and Who Bricks?
The Doormaker’s loop heavily dictates which decks survive Act 3:
Top Tier (Ironclad & Silent): The Ironclad’s brutish, high-damage attacks and vulnerability applications are perfect for the stun window. The Silent’s free attacks (Shivs) and rapid card draw allow you to cycle through the Door phase quickly and dump damage onto the boss.
Struggling Tier (Defect & Poison Builds): The Defect often requires several turns to set up orb scaling, which the Doormaker’s tight cycle violently punishes. Debuff-heavy decks also suffer; every time a Door dies, all debuffs on it vanish. While debuffs applied directly to the Doormaker persist between cycles, having to re-apply poison to every new Door makes slow-burn strategies highly inefficient here.
FAQs
Q: My poison deck melts everything else, why am I doing zero damage to the Door?
Because the Door cleanses itself when it dies. If your entire damage engine relies on stacking 50 poison over five turns, you’re going to get hard-countered. You need front-loaded, direct damage to crack the Door so you can actually apply your poison to the Doormaker itself.
Q: Should I save my potions for the final hit on the Doormaker?
Absolutely not. This is a trap. The Doormaker scales its damage infinitely the longer the fight goes on. A damage or energy potion used on Cycle 1 to guarantee a fast Door kill or a massive Turn 1 stun punish is vastly more valuable than holding it for a Cycle 4 that you might not even survive. Pop them early.
Q: I keep dying on Turn 3 of the Doormaker phase. How do I survive the Big Attack?
You are likely burning all your block cards trying to avoid chip damage from the Door. You have to accept taking a little damage during the Door phase to save your high-value block cards (or block potions) specifically for the Doormaker’s Turn 3 attack. It hits for 40+ damage base, and even higher once Empower stacks up. Plan your deck cycles accordingly.