
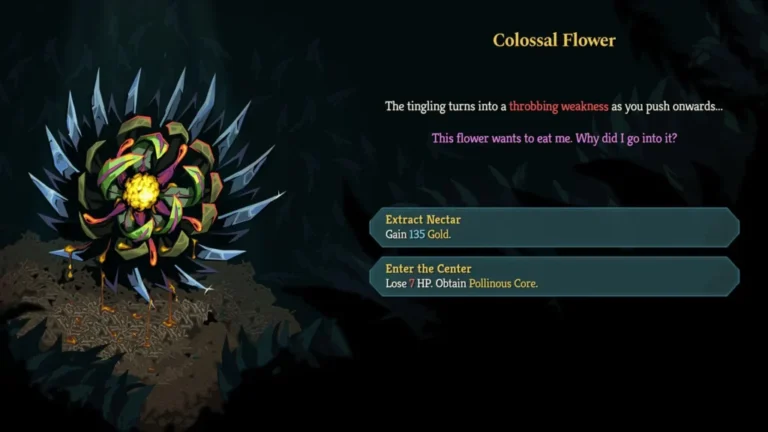
Act 2 in Slay the Spire 2 is an absolute meat grinder, and just when you think you’ve caught a break at a question mark node, the game drops the Colossal Flower in your lap. Growing atop a mountain of bones, this exclusive Act 2 event forces you to make a brutal choice: walk away with a fistful of gold, or sacrifice chunks of your precious health for a shot at one of the best utility relics in the game. You only get one shot at this event per run, and once you commit to reaching deeper into the flower, the petals close behind you. There is no backing out.
Here is the complete breakdown of the Slay the Spire 2 Colossal Flower event, the math behind the blood price, and how to decide if the grand prize is actually worth the toll.
Slay the Spire 2 Colossal Flower Event Stages Overview
| Event Stage | The Bribe (Extract Nectar) | The Blood Price (Reach Deeper) | Cumulative HP Lost |
| Stage 1 | Gain 35 Gold, leave event. | Lose 5 HP to continue. | 5 HP |
| Stage 2 | Gain 75 Gold, leave event. | Lose 6 HP to continue. | 11 HP |
| Stage 3 | Gain 135 Gold, leave event. | Lose 7 HP to obtain relic. | 18 HP |
The Anatomy of the Trap
The Colossal Flower is a masterclass in risk-versus-reward design that preys directly on your fear of missing out. The event is broken into three distinct stages. At each stage, the game offers you a payout to walk away. If you refuse the gold and reach deeper, you immediately take damage.
If you go all the way to the center, you are spending exactly 18 HP. Keep in mind, you do not get the 135 gold if you take the relic at the end. You get the relic, the damage, and a polite invitation to leave the bone pile.
The Prize: Analyzing the Pollinous Core
Before you hand over nearly twenty hit points, you need to understand what you are buying. The grand prize is the Pollinous Core, an uncommon relic exclusive to this event.
Effect: Every four turns in combat, automatically draw two extra cards.
Card draw is arguably the most vital currency in Slay the Spire 2. Having 5 Energy means nothing if your hand is full of basic Strikes when you desperately need a Block card to survive a boss nuke. Because the Pollinous Core is entirely passive, it requires zero setup and slots perfectly into almost any deck archetype. On turns four, eight, and twelve, your hand size swells, fixing bricked hands and cycling you back to your win conditions faster.
When to Bleed vs. When to Walk?
Despite how incredibly powerful the Pollinous Core is, blindly clicking through to the center is a fantastic way to end up staring at the “Run Over” screen. Act 2 elites are notoriously unforgiving, and throwing away a quarter of your health pool before fighting one is a rookie mistake.
When to Take the Gold?
This is when you should simply take the gold:
- You are below 50 HP: Swallow your pride. 135 gold is a substantial payout. That’s enough to remove a curse at a shop, buy a crucial potion, or pick up a safer relic.
- An Elite is looming: Look at your map. If there is an Elite node waiting for you in the next floor or two, you cannot afford the 18 HP tax. Take the money and survive.
- You are running a hyper-aggro deck: If your deck is designed to end fights in two or three turns (like a hyper-aggressive Ironclad build), the Pollinous Core is utterly useless. It will never trigger. Take the gold.
When to Bleed for the Core
These are the situations when it is okay to bleed:
- You have a 60+ HP buffer: If you are healthy, push for the center. Gold is a temporary resource; the Pollinous Core provides a permanent, consistent advantage that pays dividends against the Act 3 bosses.
- You have a Campfire next: If the very next node is a campfire, or if you have reliable in-deck healing (like the Ironclad’s starting relic or bite cards), the 18 damage stings a lot less.
- You are playing a slow scaling deck: If you are running Defect orbs, a Silent poison deck, or any combo-heavy build that requires setup, the extra draw on turn four is practically mandatory. It can completely swing the momentum of a prolonged fight.
Editor Recommendation’s:
- What are Status Cards in Slay the Spire II? Everything we know
- How to beat the Doormaker in Slay the Spire II?
- What are Defect Cards in Slay the Spire II? A Complete Guide
- What Does the Golden Compass Do in Slay the Spire 2?
- How Does Co-Op Work: Slay the Spire 2 Multiplayer Guide
- Slay the Spire 2 Ascension Levels: Full Difficulty Breakdown and Unlock Guide
FAQs
I'm at exactly 40 HP, but the node right after the Colossal Flower is a shop. Do I take the 135 gold or bleed for the relic?
Take the 135 gold without hesitation. Entering a shop with an extra 135 gold means you can likely afford a premium relic or a vital card removal that won’t cost you half your remaining life. Dropping to 22 HP in Act 2 is essentially a death sentence.
Is it ever a smart play to just stop at Stage 2 for the 75 gold?
Absolutely. Taking 5 HP damage for 75 gold is a fantastic trade-off if you just need a slight cash injection for an upcoming merchant. Slay the Spire 2 is a game of inches; don’t let the sunk-cost fallacy force you to the center of the flower if you only came for pocket change.
Does the Pollinous Core trigger exactly on turn four, or after four full rounds of combat?
It triggers exactly at the start of your 4th turn, 8th turn, 12th turn, and so on. As soon as you draw your opening hand for that turn, two extra cards will automatically pop into your grip.

iGK
Administrator
For Gamers, From Gamers Explore the evolving landscape of Gaming with iGK! 🌟 Perfect for Gaming and Sports enthusiasts and industry professionals.